Symbiosis is an easy to use hosting environment developed by Bytemark. The system includes backup2l to handle backups. backup2l is a lightweight command line tool for generating, maintaining and restoring backups.
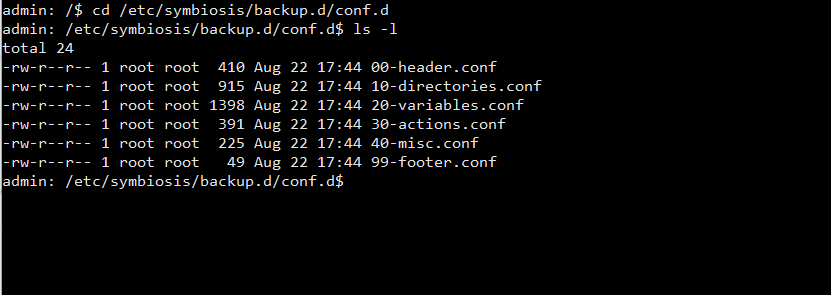
The backup2l configuration is generated from the snippets inside the /etc/symbiosis/backup.d/conf.d folder.
Modify these files to change the local directories to backup, the destination and number of backups to keep etc. If you update the configuration, modify the files inside /etc/symbiosis/backup.d/conf.d/ then run sudo make from the path /etc/symbiosis/backup.d/ to generate a new config file. Do not modify the backup2l.conf file directly.
By default local backups are stored in /var/backups/localhost/ and /var/backups/mysql/ .Symbiosis assumes it has access to an associated external storage area on Bytemark’s network. It will try to use rsync to upload backups to this area. The backup script will automatically guess the rsync path, however, you can override this by manually specifying the rsync path in /etc/symbiosis/dns.d/backup.name. If the name of the machine is example, backups will be uploaded to example.backup.bytemark.co.uk::example/example.vm.bytemark.co.uk/ .
Backups using public / private key pair
1. Enable root SSH login (destination server)
Login to the backup machine and enable root SSH logins. Edit the sshd_config file /etc/ssh/sshd_config and add:
PermitRootLogin yes
Restart the SSH server with service sshd restart .
2. Generate keys (source server)
We can now setup ssh so that it doesn’t ask for a password when you perform ssh. Use the ssh-keygen command on the local server to generate public and private keys. On a Symbiosis machine you must do this as root.
sudo su
Move to the home directory of root:
cd ~
Generate keys, use an empty passphrase:
ssh-keygen
3. Copy public key to remote host
Use ssh-copy-id, to copy the public key to the remote host (192.168.170.24):
ssh-copy-id -i ~/.ssh/id_rsa.pub 192.168.170.24
The above will ask for the password of the root account on the remote host.
If you want to use a specific account on the destination server instead of root run:
ssh-copy-id -i ~/.ssh/id_rsa.pub [email protected]
Make sure you use the same username specified in the backup.name file, see step 5 below.
4. Test rsync over ssh without a password
You can now ssh to the remote host without a password. If you are root run:
ssh 192.168.170.24
otherwise test using:
sudo ssh [email protected]
5. Change the default backup location (Symbiosis)
Switch back to the admin user (type exit). Create a file called backup.name using the command sudo nano /etc/symbiosis/dns.d/backup.name . Add a string in the format <user>@<host>:<rsync_path> . This should be a full-specified rsync path:
[email protected]:/root/backups
or
[email protected]:/home/backupusername/backupfolder
6. Install rsync on the destination
Make sure rsync is installed on the destination server, run sudo apt-get install rsync ,
7. Test backups
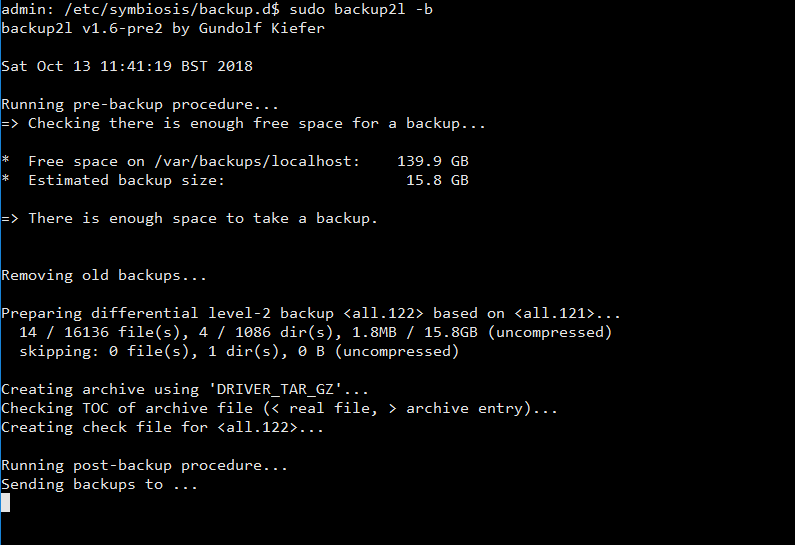
Run the command sudo backup2l -b or sudo backup2l -e (like -b but nothing is really done).
Backups using sshpass
If you don’t want to use public / private keys there is a workaround using sshpass.
sshpass can be used to send the password to rsync. ssh uses direct terminal access to make sure that the password is issued by an interactive keyboard user. sshpass runs ssh in a dedicated tty, fooling it into thinking it is getting the password from an interactive user.
On a production machine we recommend using authentication keys. The following was implemented on an internal development machine:
1. Install sshpass
sudo apt-get install sshpass
2. Add the host key
To avoid the host key verification failed error ssh to the destination machine, verify and add the new host keys.
sudo ssh [email protected]
3. Install rsync on the destination machine
Make sure rsync is installed on the backup target.
sudo apt-get install rsync
4. Add a user
The destination server is used to keep backups from several development machines. Each source machine has a separate login.
sudo adduser web1
5. Post backup script
Symbiosis executes two scripts before and after backup. To change the backup destination we need to modify the /etc/symbiosis/backup.d/post-backup.d/99-upload-backup script.
sudo nano 99-upload-backup
Change the following:
a) comment out the check for a backup space name
#
#  If we didn't get a name then exit.
#
#if name.empty?
#  exit 0
#end
b) change the rsync command
#
#  Now rsync.
#
#  If the name of the machine is example.vm.bytemark.co.uk we'll expect
# to upload to:
#
#    example.backup.bytemark.co.uk::example/example.vm.bytemark.co.uk/
#
puts "Sending backups to #{dest}...\n"

puts `sshpass -p 'mypassword' rsync --bwlimit=768 --delete-before --delete-excluded --exclude 'localhost/TMP.*' --exclude 'localhost/*.lock' --quiet --archive --recursive --perms --no-owner --no-group --human-readable #{src} [email protected]:/home/web1/Symbiosis_Backups`
For local development machines increase the –bwlimit parameter. It’s there to prevent the script from using too much bandwidth on a live web server. The value is in KB / s (Kilobytes per second).
If you are using this method, please note, Symbiosis runs a pre backup script located in /etc/symbiosis/backup.d/00-download-backup . Make changes to the rsync command in this script too.
6. Test backups
You can force a backup using the command sudo backup2l -b or sudo backup2l –estimate Review output for errors.